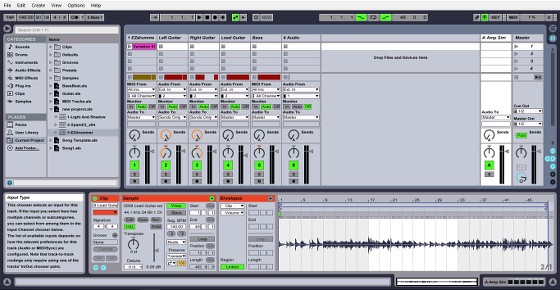
One of the main things that separates Ableton Live from other DAWs is the unique way it allows you to record and put together songs. Most DAWs arrange songs in a timeline from left to right, with each track stacked on top of each other horizontally.
In Ableton Live that’s called Arrangement view, but there’s also a secondary way to display tracks vertically with stacked slots to record and arrange individual clips, such as a chorus or intro or alternate versions of a verse, etc. This is called Session view.
You can select to launch whichever clip or clips that you want to play in Session view, which order they are in and when they kick in.
Then after you flesh out the different parts of a song it can be recorded over in any order that you choose into Arrangement view—in fact it has to be in order to export a finished audio file.
You could just use Arrangement view for everything if you wanted. The unique thing with Ableton Live is Session view where you can record individual takes and clips to edit and work on in Session view. You can organize them into “Scenes” where clips from multiple tracks play simultaneously (drums, bass, guitar, etc).
It depends on what version of Live you are using how many scenes, tracks, and clips you can have in one set. This information is listed on the Feature Comparison Chart on Ableton’s website.
The only problem with the chart is they don’t include the Lite version for some reason, which is what I’m running (it came free with an Alesis MIDI keyboard controller). Ableton Live Lite allows for 8 tracks, 8 scenes, with 8 clip slots per track, and 4 input/output channels. So basically it seems to be mostly the same as the Intro version except with 8 fewer tracks.
User Library and Recorded Clips
One of the cool things with the clip recording concept of Session view is the fact that all your recorded clips, custom MIDI grooves, and created drum patterns automatically get saved in your user library/project and can easily be imported and used in any project that you’re working on in Ableton Live.
Just open up Live’s browser and navigate to the User Library or Current Project folders to find your recordings and projects. From there you can drag clips into slots, listen to previews with a click, or double click to add clips to your current project. You can also drag complete tracks from other projects, with plugins and settings included.
Loop Recording
With Ableton Live, there’s a technique where you can set a loop and then record multiple takes while running the loop, but the recording continues to go on while looping to create one long continuous take that you can edit to your preference.
This works by setting a loop region in Arrangement view, then when you record it just looks like the recorded track keeps overwriting itself.
At the end of the recording, there’s invariably a partial overlap. Just hit undo to get rid of it. Each undo also deletes each successive take that overlapped because of the loop. When you playback the arrangement, it will play the last take. To view the full recording all at once, double-click the clip to display Clip view, where you can edit it and make changes and isolate certain sections if you want, which you can then create Clips out of as well.
Punch In and Punch Out
Like most DAWs, Ableton offers an easy way to re-record certain sections of a take without having to redo the entire take.
To do this you use the Punch In and Punch Out controls next to the loop switch. To activate, simply drag the loop brace edges to highlight the section to re-record. Then click the Punch In and Punch Out buttons to enable. Set the marker where you want to begin, then when you start recording only the material within the loop brace will get overwritten with the new take.

