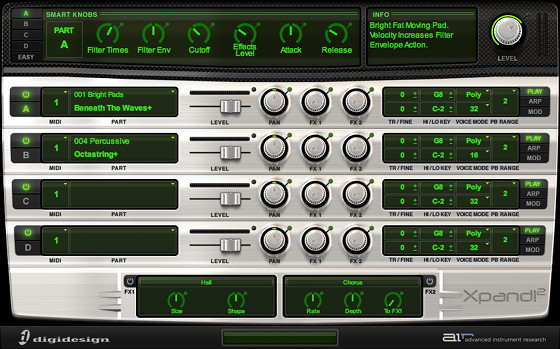
Xpand2 is one of the six free plugins that comes with Pro Tools recording software in a downloadable Creative Collection plugins package from Air Music. Xpand2 is also available for purchase separately without Pro Tools.
Xpand2 includes a whole host of virtual instruments and sounds, including things like guitars, pianos, basses and drums, along with thousands of effects, loops, vocals and other sounds.
There’s over 2500 presets, two digital effects processors, 50 editable effects, multiple sound generation engines, six smart knobs to tweak sound, and a lot more.
When I first got Pro Tools 11 I didn’t realize all the things Xpand2 was capable of doing. Once again I went over to YouTube and found some great video tutorials to learn how to get started using the plugin.
I’ve added a quick summary of notes below the videos to highlight the main points to remember.
This first video is a great starting point. It shows how to set things up from the very beginning, and how to use the MIDI editor in Pro Tools to create and edit sounds using Xpand2.
Drums & Basics of MIDI Editing
Getting Started Summary
- Create a new instrument track and then set it to use the Xpand2 plugin from the instrument list.
- Use external MIDI keyboard or Pro Tools’ MIDI editor to play selected sounds.
- Right-click on instrument track to select to open in MIDI editor, then use virtual keyboard to play sounds.
- Use presets list to choose instruments and sounds to use.
- Make sure green effects light is turned on before using FX knobs; two effects can be added to each channel.
- Double-click on grid where you want to add notes/sounds.
- Adjust tempo by clicking the red tempo button in the main window.
- Use slip mode to slide beats and notes freely; use grid mode to move notes strictly within the grid.
- Double-click and drag to move notes around the grid.
- To get rid of something double-click it.
- Hold command (Mac) or control (Windows) on a note and then move mouse up or down to adjust velocity or loudness of a sound; watch line below grid to see level.
- Copy something: hold alt or option and click and drag.
Pro Tools Expert has a helpful series of YouTube videos that explain how to use the Xpand2 plugin. The first two videos go together and the last video is especially cool—it shows how to get a bunch of different interesting sounds out of a single lame guitar part.
Pro Tools Xpand2 Tutorial Part 1
Pro Tools Xpand2 Tutorial Part 2
Xpand2 Tutorial Summary
- Confirm the Xpand2 MIDI channels on the left of the display are set to the same instrument channel you want to modify.
- Use the TR/Fine field to adjust octaves, visible in play mode.
- Use mono to play single notes instead of whole cords, useful with bass instruments.
- Use volume gate setting for pulsing effect.
- Mono Sine is a good option for sub bass.
- To use each Xpand2 channel separately in the main editor, go to Auto and select each part (A, B, etc) and choose “On” to add them to the automation list, which can be selected under the instrument track and added from the bottom of the drop down menu. Use the plus symbol to add each channel A-D.
- Use smart tool to highlight and select where on the grid to start each individual channel.


Hi, I am really enjoying your videos! I have a question for you. In the second video you transpose the bass by 24 semitones, but unless I missed it, you didn’t show how you did it. I am in play mode, and nothing happens when I click on the minus. What am i doing wrong??? thanks!
These aren’t my videos. They’re just a roundup of tutorials on YouTube from when I was first learning to use Xpand2 and I don’t use it enough anymore to know the answer….
thanks, figured it out myself. just out of curiosity what are you using now? Im having a hard time getting the string sounds Im looking for with xpand
Not sure what kind of strings you’re looking for but a lot of people like Ample Sound’s guitar plugins. They have a couple freebies too. I play guitar so I just go for the manual method and use amp sims. 😀